Introduction: Online tracking is an optional function that allows you to log into a website to see the Tracker's location in real-time. When this function is activated, your Tracker will upload tiny data packets with location information to the online tracking server, which also allows you to see route history. You can still use text-based locations as normal.
It's not as complicated as it looks: It might look complicated when scrolling through the steps, but that's only because we've tried to outline each step to make it simpler to follow, and prevent any confusion. As long as you follow the steps, it should be fairly simple!
Costs: Using online tracking uses data on your SIM plan, which with GiffGaff is 10p per megabyte, so shouldn't cost more than about 50p per month to use. If you're with another network, you'll have to research your data costs.
Switching on and off once you're set up: You may not wish to always use online tracking, so won't want to waste data costs or unnecessarily drain the battery (constant location uploads obviously keeps the device 'busier'). To stop the device uploading locations, text S0 (that's a zero, not letter). To switch it back on again, text S2.
Help & Troubleshooting: The tracking platform itself is free to use, but please be aware it's provided by a third-party. Please let us know if you have any issues (or if there are any changes that would be useful for us to know).
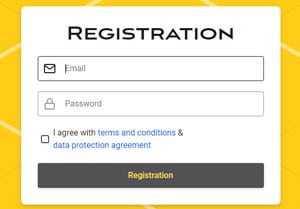
1. Visit GPS Trace (gps-trace.com) (clicking will open in a new tab), then click "SIGN UP".
2. Register an Account: Register with a working email address and password (please note they are CASE SENSITIVE). There won't be any important information in your account (just locations), so you can keep the password simple if it helps remember it. Please note that we cannot help with lost/forgotten login information.
You will also need to activate your account by clicking on the link in the email that will be sent to you. If you don't receive it, check your junk folder.
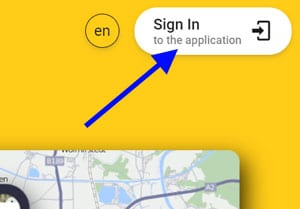
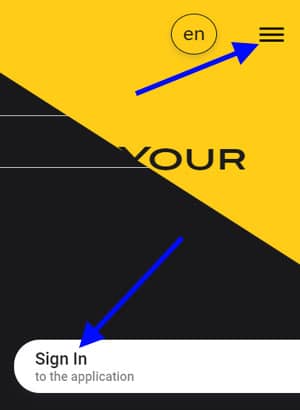
3. Log In: When you're back on the site having activated your account, click on "Sign In" in the top right corner (via the menu button on a mobile).
You might also want to save the page as a bookmark on your browser or phone's home-screen once you're in.
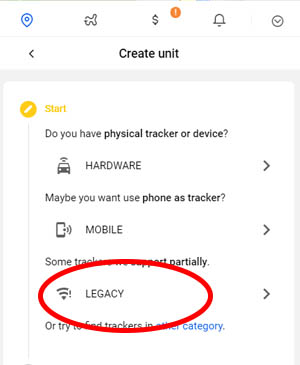
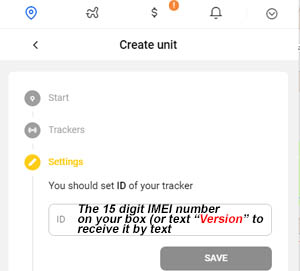
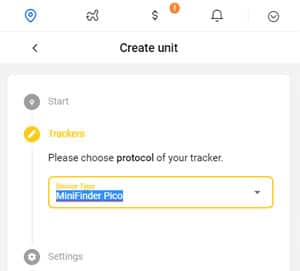
4. Create Unit: You can now set up your Tracker in your online tracking account.
First select the LEGACY option.
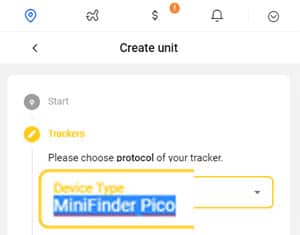
Then start typing "minifinder pico" until the option appears - then select it.
For ID you will need to type the unique 15 digit IMEI number for your device.
There are two ways to find this number:
- it is written under a barcode on the side of the packaging box
- you can text "version" to the device, and it will text you back with the 15 digit number.
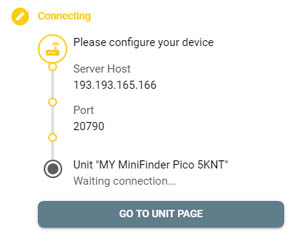
You will see information about a server host and port - don't worry about this, just click "GO TO UNIT PAGE".
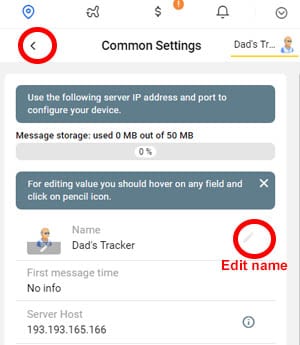
You can change the name and icon for your device here if you wish by clicking on the pencil icon next to the name. Change it, then click the tick.
Then click the back arrow next to "Common Settings".
You won't see the Tracker accurately located on the map just yet. We just need to tell the device to start uploading its locations - and where to upload them to.
5. Activate Online Tracking on The Device: You will now have to send three text messages to the tracker before it will show on the map:
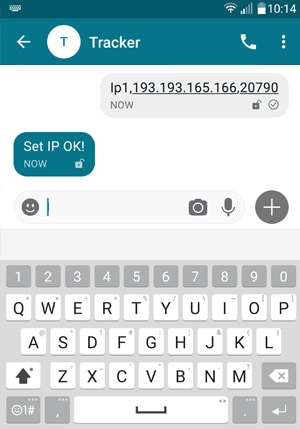
First text:
IP1,193.193.165.166,20790
that's
IP1(comma)193(dot)193(dot)165(dot)166(comma)20790
You need to get this right - don't mix up dots, commas or numbers or it won't work. It tells the tracker which server and port to send the location information to. If you think you might have texted it wrong, just text it again and it will overwrite the last setting. It will reply "Set IP OK!" even if you get the numbers wrong.
Then text:
S1,giffgaff.com
This tells the device to activate the data via your Network provider, and to switch on the online tracking. If you aren't with GiffGaff, you'll have to Google the APN for your Network provider, and replace giffgaff.com for your own. Again, make sure you put the comma, and no spaces. It will reply "Set APN OK!"
Then text:
Mode5,03M
This tells the device to upload its location to the server every three minutes while it's in motion. You could also text Mode5,20M if you wanted twenty minute intervals instead - this would increase the battery duration by about 30%.
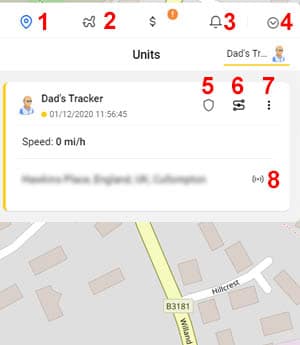
6. Tracking: It should soon start showing on the map!
Here's a guide to the screen options (although note that it is being regularly updated so may differ slightly) - typically hovering over an option will tell you what it does:
1. Map/Live Location view
2. See individual trips by day
3. Notifications (e.g. alerts)
4. Further options. Here you can set geofences (more info below), see all routes taken in a day (under dashboard), and change the map to an aerial view (under user settings).
5. Security mode - will set an immediate 100m geofence from the current location. Be aware alerts will only beep if using as an app on your phone - it will not text you.
6. Show track - where the device has been today.
7. Settings. Under "Settings" then "Common" you can change the name/icon for your device.
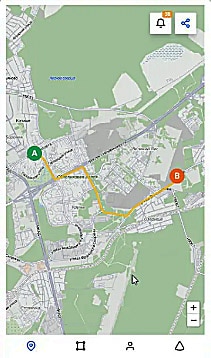
8. Create a temporary link to copy/paste in an email to someone else, to share the location with them (e.g. if on an active search).
More Useful Information
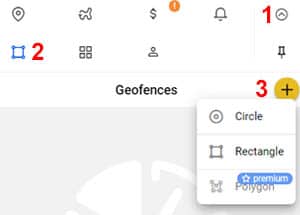
Geo-fences: Click the icons in sequence as shown (1,2,3) to create a geofence. You can choose a circle or rectangle shape. On a circle, the small right square at about 2 o'clock on the circle allows you drag the radius in or out. Dragging the middle of the circle allows you to move it on the map.
This creates a 'zone'. When your Tracker moves out of this zone, it show as a notification in your account. You can see notifications by clicking the bell symbol in the top right.
If you only want to see geo-fence notifications, you can de-select other events ('7' then 'Settings', 'Notifications' in Step 6 above).
If breached, you can receive notifications via the app (see below).
Available App (optional)
The same web-based version of the tracking platform is available as an app instead. It can be downloaded from the tracking platform (links in lower left corner).
The main difference is that notifications will beep on your phone, for whatever you have selected (e.g. trips starting and finishing, geo-fence alerts.
Available App (optional)
The same web-based version of the tracking platform is available as an app instead.
The main difference is that notifications will beep on your phone, for whatever you have selected (e.g. trips starting and finishing, geo-fence alerts. Be aware though, currently geo-fences alert every ten minutes when a boundary is breached, rather than just once to let you know it's happened).
The iPhone version of the app is currently in Beta testing, but should function as normal.


1. Visit GPS Trace (gps-trace.com) (clicking will open in a new tab) then click on "SIGN UP".
2. Register with a working email address and password (please note they are CASE SENSITIVE). There won't be any important information in your account (just locations), so you can keep the password simple if it helps remember it. Please note that we cannot help with lost/forgotten login information.
You will also need to activate your account by clicking on the link in the email that will be sent to you. If you don't receive it, check your junk folder.
3. When you're back on the site having activated your account, click on the menu button (top right) then "Sign In" in the drop down menu (appears at the bottom).
You can save the page as a bookmark on your phone's home screen once you're in.
4. Set Up Your Unit
You can now set up your Tracker in your online tracking account. Enter these settings:
First select the LEGACY option.
Then start typing "minifinder pico" until the option appears - then select it.
For ID you will need to type the unique 15 digit IMEI number for your device.
There are two ways to find this number:
- it is written under a barcode on the side of the packaging box
- you can text "version" to the device, and it will text you back with the 15 digit number.
You will see information about a server host and port - don't worry about this, just click "GO TO UNIT PAGE".
You can change the name and icon for your device here if you wish by clicking on the pencil icon next to the name. Change it, then click the tick.
Then click the back arrow next to "Common Settings".
You won't see the Tracker accurately located on the map just yet. We just need to tell the device to start uploading its locations - and where to upload them to.
5. Activate The Device
You will now have to send two text messages to the tracker before it will show on the map:
First text:
IP1,193.193.165.166,20790
that's
IP1(comma)193(dot)193(dot)165(dot)166(comma)20790
You need to get this right - don't mix up dots, commas or numbers or it won't work. It tells the tracker which server and port to send the location information to. If you think you might have texted it wrong, just text it again and it will overwrite the last setting. It will reply "Set IP OK!" even if you get the numbers wrong.
Then text:
S1,giffgaff.com
This tells the device to activate the data via your Network provider, and to switch on the online tracking. If you aren't with GiffGaff, you'll have to Google the APN for your Network provider, and replace giffgaff.com for your own. Again, make sure you put the comma, and no spaces. It will reply "Set APN OK!"
Then text:
Mode5,03M
This tells the device to upload its location to the server every three minutes while it's in motion. You could also text Mode5,20M if you wanted twenty minute intervals instead - this would increase the battery duration by about 30%.
6. Tracking: It should soon start showing on the map!
Here's a guide to the screen options, although note that it is being updated regularly so may differ slightly:
1. Map/Live Location view
2. See individual trips by day
3. Notifications (e.g. alerts)
4. Further options. Here you can set geofences (more info below), see all routes taken in a day (under dashboard), and change the map to an aerial view (under user settings).
5. Security mode - will set an immediate 100m geofence from the current location. Be aware alerts will only beep if using as an app on your phone - it will not text you.
6. Show track - where the device has been today.
7. Settings. Under "Settings" then "Common" you can change the name/icon for your device.
8. Create a temporary link to copy/paste in an email to someone else, to share the location with them (e.g. if on an active search).
Geo-fences: Click the icons in sequence as shown (1,2,3) to create a geofence. You can choose a circle or rectangle shape. On a circle, the small right square at about 2 o'clock on the circle allows you drag the radius in or out. Dragging the middle of the circle allows you to move it on the map.
This creates a 'zone'. When your Tracker moves out of this zone, it show as a notification in your account. You can see notifications by clicking the bell symbol in the top right.
If you only want to see geo-fence notifications, you can de-select other events ('7' then 'Settings', 'Notifications' in Step 6 above).
Unfortunately at present, there is no way to have notifications 'ping' you, or email out. If you need this function, stick to the text-based geofencing explained in the devices manual which will send you text-alerts. If this changes with online tracking, we'll update it at the top of this page.
Available App (optional)
The same web-based version of the tracking platform is available as an app instead.
The main difference is that notifications will beep on your phone, for whatever you have selected (e.g. trips starting and finishing, geo-fence alerts.
If you get stuck: Please contact us here, and please include your online account login in the message box so we can try to solve your issue quicker.
Introduction – Please Read!
Online tracking is an optional extra method of tracking – you can log into an online account, where you can see the Tracker’s location and history. Please note that whether or not you have online tracking enabled, you can still get location texts via the loc text.
When you enable online tracking on your device, it will regularly “upload” its location to a web server, where you can log in to see the current location and where it’s been at any time since enabling online tracking. Online tracking can be turned on or off using simple text commands sent remotely from your mobile phone.
When using online tracking, the SIM card will use “data” – this is internet usage, as opposed to just text message or call minutes. GiffGaff charge just 5p per megabyte of use from your top-up airtime credit. In a whole month of online tracking, this will only amount to about 10p because the individual location uploads are so small.
These pages explain how to set up online tracking, and will take about 10 minutes. Please read them carefully!
Next: Get Started – Set Up The Tracker
(If you've already been through the set-up process, and are just wanting the 'Helpful Information' bit from the last section - click here to jump to it!)