Online Tracking for your Car GPS Tracker
Introduction: Online tracking is an optional function that allows you to log into a website to see the Tracker's location in real-time. When this function is activated, your Tracker will upload tiny data packets with location information to the online tracking server, which also allows you to see route history. You can still use text-based locations as normal.
When using a mobile phone, the screens will be slightly different, but follow the same logic.
It's not as complicated as it looks: It might look complicated when scrolling through the steps, but that's only because we've tried to outline each step to make it simpler to follow, and prevent any confusion. As long as you follow the steps, it should be fairly simple!
Costs: Using online tracking uses data on your SIM plan, which with GiffGaff is 10p per megabyte, so shouldn't cost more than about 50p per month to use. If you're with another network, you'll have to research your data costs.
Help & Troubleshooting: The tracking platform itself is free to use, but please be aware it's provided by a third-party. Please let us know if you have any issues (or if there are any changes that would be useful for us to know).
1. Visit GPS Trace (gps-trace.com) (clicking will open in a new tab).
Click on "Sign up".
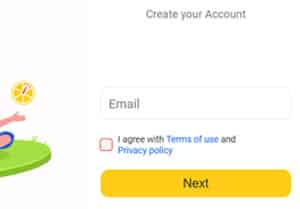
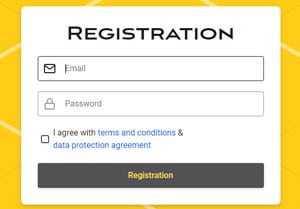
2. Register an Account: Register with a working email address and password (please note they are case sensitive). There won't be any important information in your account (just locations), so please keep the password fairly simple - you might need to share this with us if you need assistance later.
We cannot help with lost/forgotten login information.
You will also need to activate your account by clicking on the link in the email that will be sent to you. If you don't receive it, check your junk folder.
3. Log in: When you're back on the site having activated your account, click on "Sign In" in the top right corner (or the three-line menu button on a mobile).
Then select the symbol as shown to be taken to the tracking page.
You might also want to save the page as a bookmark on your browser or phone's home-screen once you're in. The web address to remember is m.gps-trace.com.

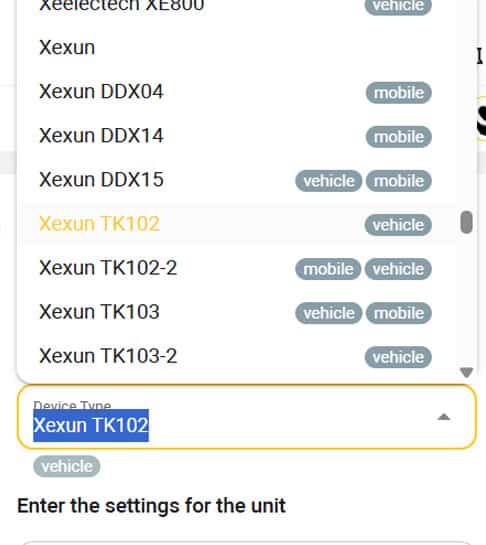
4. Create Unit: You can now set up your Tracker in your online tracking account by clicking on the yellow cross. Enter these settings:
ID: Text imei123456 to the device to get the IMEI number via text
Device Type: Xexun TK102 - You will see vehicle written in grey to the right of it, like shown in the picture below.
Change Icon: If you like, choose an icon from the selection for the map pointer
...then hit SAVE
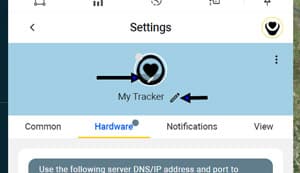
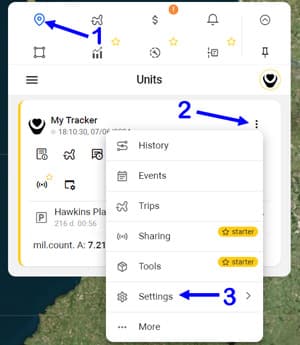
You can change the name and icon for your device here if you wish by clicking on the pencil icons. Once you enter a name, click the tick to save it.
Then click the back arrow to the left of "Settings".
You may see a blue location dot on the map - this is not the Tracker's location, but your mobile phone or desktop that is showing on the website. You haven't activated online tracking on the Tracker yet (that's the next step) - when you do, it will show as a separate, yellow dot.
5. You will now have to send two text messages to the tracker before it will show on the map. The first one needs the IP address and port from the last screen (this uses the example above - please change it for whatever shows up on your screen):
adminip123456 185.213.2.30 26731
(This needs to be exactly as above, or it won't show on the map. Ensure you put the comma and full-stops in the right places, and NO SPACES! It tells the tracker which server and port to send the location information to.)
apn123456 giffgaff.com
(This tells the device to activate the data via your Network provider, and to switch on the online tracking. If you aren't with GiffGaff, you'll have to Google the APN for your Network provider, and replace giffgaff.com for your own. Make sure you include the space)
6. It should soon start showing on the map! If its still not showing after a few minutes, text gprs123456 to the tracker to tell it to switch to GPRS mode. Then refresh after a few moments. To switch back to SMS reporting, rather than online, you can text sms123456 to the tracker.
Now, when you get a location by calling the device, it will instead upload the location to your GPS Trace account.
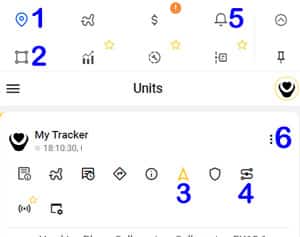
Here's a guide to the options (although note that it is being regularly updated so may differ slightly) - typically hovering over an option will tell you what it does:
1. Main unit view
2. Create a geo-fence
3. Follow the tracker's location (keeps it centre of the map)
4. Show location history (note: the free tier of the tracking platform only allows for twelve hours of history, so you will need to check each night to see that day's activity and take a screenshot if you need to)
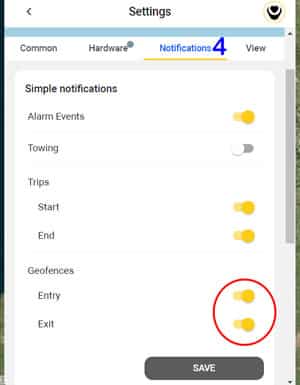
5. Notifications (geofence alerts)
6. Open menu (e.g. to switch notifications on/off, change name/icon)
Available App (optional)
The same web-based version of the tracking platform is available as an app instead.
This will allow you to receive geofence pings on your phone.


If you get stuck: Please contact us here, and include your online account login in the message box so we can try to solve your issue quicker.